Saturday, December 02, 2006

Christmas Angel Tea Cosy - crochet


This is particularly kitsch but oh so cute. The Christmas Angel is an adaptation of the scallop tea cosy in my May post.

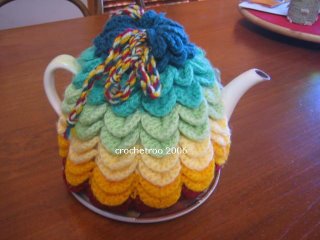
From this Scallop Tea Cosy pattern posted in May:

To this sassy Angel Tea Cosy in December. Imagine this little darling sitting on your Christmas table! Or whip up a few for gifts, packaged with some nice teas.


So here are the instructions. Remember there are Australian and American versions so make sure you use the correct ones. I hope you enjoy making this little sweetie and that she gives someone Peace and Joy at Christmas.

Australian Instructions
8ply yarn Size 8 or 4mm hook

Head Use flesh coloured yarn
1. 2ch, starting in 2nd from hook make 8htr, slst join.
2. 2ch, 1htr same space, then 2htr each sp around, slst join = 16
3, 4, 5, 6 work 2ch, 15htr around, slst to join = 16.
7. 1ch, 2dc tog, 1dc next 6, 2dc tog, 1 dc next 6, slst = 14
8. 1 dc each sp around = 14, do not join, cut off leaving length to sew onto body.

Angel Hair (I thread 3 stars onto yarn which I used in row 2.)
Using a large hook – 5mm and make a 3ch circle.
1. 3ch, then work 11tr into circle, 1slst to join.
2. 2ch, 1tr, then 2tr in to each st around = 24
3. 1dc, 1dbtr around. Finish off and stitch to head,

Follow the instructions to make a scallop tea cosy then stitch her head to the top. Using sparkly yarn you can dress up your angel.


Angel Tea Cosy
American Instructions


8ply/ worsted weight yarn Size 8 or 4mm hook

Head: Use flesh coloured yarn
1. 2ch, starting in 2nd from hook make 8hdc, slst join.
2. 2ch, 1hdc same space, then 2hdc each sp around, slst join = 16
3, 4, 5, 6 work 2ch, 15hdc around, slst to join = 16.
7. 1ch, 2sc tog, 1sc next 6, 2sc tog, 1sc next 6, slst = 14
8. 1sc each sp around = 14, do not join, cut off leaving length to sew onto body.

Angel Hair (I thread 3 stars onto yarn which I used in row 2.)
Using a large hook – 5mm and make a 3ch circle.
1. 3ch, then work 11dc into circle, 1slst to join.
2. 2ch, 1dc, then 2dc in to each st around = 24
3. 1sc, 1tr around. Finish off and stitch to head,

Follow the instructions to make a scallop tea cosy then stitch her head to the top. Using sparkly yarn you can dress up your angel.


This is an original design protected by copyright.

(c) crochetroo 2006. This also includes the images on this page as well as the pattern.
Do not reproduce pattern or images by any means. You may use it for personal use, gifts and charity fundraising. Do not sell to make a personal profit. I design with the intention of giving. This is the Christmas Spirit.

HAPPY GIVING!


Sunday, November 19, 2006

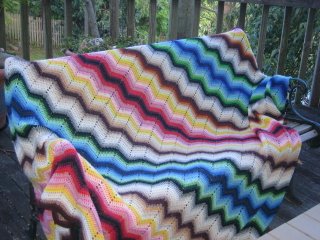
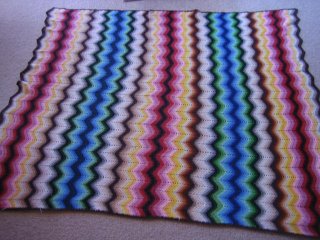
Crochet Ripple Rug circa 8Os


Voila the Ripple rug that I did in the 80s. This one has been stuffed in the back of a cupboard for a while now as zig zag crochet became crass. I remember doing this one when the kids were young. I like the effect of the rainbow. Basically this was all odds and sods and I somehow managed to get a pattern in the way the colours worked.


The stitch is a simple treble or double crochet as the Americans would say. I can't believe I ever did this. There is no way I would take on something of this size again. Those rows are quite long - 300 stitches across, and 164 rows of 10 up, 2ch, 10 down, miss 1 and then up again. The zig zag ripple gives the fabric a bit of stretch. This rug used to be a favourite for sleepovers when the kids were little. Now it is stuffed in a cupboard. I am sure it will have a few more days of glory if I hang onto it.


It is worked in 5 ply yarn which is hard to come by now, and double knit or 8 ply seems to have taken over.

Any hoos thanks for looking!

Sunday, November 12, 2006

Happy Bottle Bags - free crochet pattern

Happy Bottle Bags
(c)crochetroo 2006 please respect my copyright
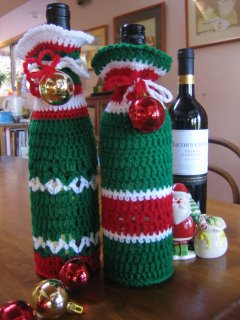
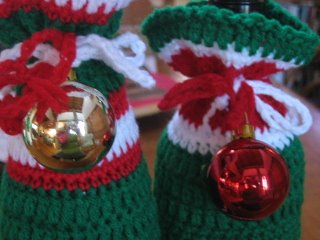
Here is a pattern for some Happy Bottle Bags which I have designed with Christmas in mind.

The pattern hasn't been tested, and you may have to experiment with different types of yarn. I have used Carnival , or Magnum 8ply. The cheeper the yarn the better as the tough scratchy stuff works up pretty stiff which is perfect for these bags.

I think they look rather cute and sure provide a special touch to the gift bottle of wines that seem to be about at Christmas. While I have provided some basic instructions you can experiment with your own colour combinations.

These two work nicely on a bottle of Jacob Creek red, and Brown Brothers Crouchen Riesling. These two would have to be amongst my favourite Australian wines.


I have provided instructions below in both Australian and American terminology so make sure you use the correct ones. While the pattern is copyright, I don't really care what you do with the finished product as long as it isn't sold in commercial quantities. Christmas is a time of giving and I would encourage you to enjoy making these with that in mind.

Happy Bottle Bags (c)crochetroo
Australian Instructions

8ply, double knit, worsted weight yarn, Size 8 or 4mm hook

Step 1: Make a base.
Base is worked in rounds; join with slst at end of each round.
1. 4ch ring, then 3ch (counts as first tr throughout), 11tr into ring, slst into start ch = 12tr
2. 3ch, 1tr same place, 2tr each st around, slst to join = 24tr
3. 3ch, 1tr same place, (1tr next st, 2tr next st) around = 36tr

4 or Row 1 of the side. 3ch start then 1bptr in each st around, slst into start ch = 36tr post.

Count your stitches. You should have 36tr around.

Step 2 Make the sides.
Use alternating colours to get a Christmas effect.

Pattern options
Always have at least 3 groups of 2rows of dc in each bag. This adds stability to your bag otherwise it may get too stretchy.

A. Plain Treble
3ch, 1tr next 35st around, slst into 3start ch

B. Plain Double Crochet
1ch, 1dc next 35st, slst into start ch NOTE 2 rows of dc = 1 row of treble.

C. V Stitch
3ch, 1tr in same st, * miss 1st, 2tr next st around slst into start ch.

D. Crossed Treble
Start 2nd st from end, 3ch, then 1tr in st before, miss 1st, 1tr next st, then 1tr in missed st before. Work around crossing your stitches. 1slst finish into start ch.

E. Shell
R1. 1dc in start st, *miss 1, (1tr, 1ch, 1tr) next st, miss 1 then 1dc next st. Continue from * around finishing with slst join.
R2. Work start 1dc in 1ch sp between trebles, work (1tr 1ch 1tr) in 1dc of prv row.
If following shell with a plain tr row, work 3tr into each 1tr sp, and 1tr into each 1dc.

F. Lattice
4ch, * miss 1tr then 1tr next st, 1ch from * around slst into 3start ch = 18posts and 18 spaces around

Work 16 rows up side, counting 2dc rows as 1 tr row. You may need more depending on the size of your bottle.

Step 3: Make the Bottle top
Work 2 rows dc
1row plain tr
1row of lattice
1 row tr
2rows dc
1row tr then work a final row of 1ch, 1slst around.

Step 4: Finish off
Make 2 lengths of ch each 20 inches/ 50cm.
Weave one through lattice row and knot ends, Weave second piece of chain through alternative spaces and knot on opposite tide of bag. This will give you 2 ties to pull up and tie in a bow. Add decorations if you wish.


Happy Bottle Bags
American Instructions
(c)crochetroo
8ply, double knit, worsted weight yarn, Size 8 or 4mm hook

Step 1: Make a base.
Base is worked in rounds; join with slst at end of each round.

1. 4ch ring, then 3ch (counts as first dc throughout), 11dc into ring, slst into start ch = 12dc
2. 3ch, 1dc same place, 2dc each st around, slst to join = 24dc
3. 3ch, 1dc same place, (1tr next st, 2dc next st) around = 36dc

4 or Row 1 of the side. 3ch start then 1bpdc in each st around, slst into start ch = 36dc post.

Count your stitches. You should have 36dc around.

Step 2 Make the sides.
Use alternating colours to get a Christmas effect.

Pattern options
Always have at least 3 groups of 2rows of sc in each bag. This adds stability to your bag otherwise it may get too stretchy.

A. Plain Double Crochet
3ch, 1dc next 35st around, slst into 3start ch = 36

B. Plain Single Crochet
1ch, 1sc next 35st, slst into start ch = 36 NOTE 2 rows of sc = 1 row of dc.

C. V Stitch
3ch, 1dc in same st, * miss 1st, 2dc next st around slst into start ch.

D. Crossed Double Crochet
Start 2nd st from end, 3ch, then 1dc in st before, miss 1st, 1dc next st, then 1dc in missed st before. Work around crossing your stitches. 1slst finish into start ch.

E. Shell
R1. 1sc in start st, *miss 1 (1dc, 1ch, 1dc) next st, miss 1 then 1sc next st. Continue from * around finishing with slst join.
R2. Work start 1sc in 1ch sp between trebles, work (1dc,1ch ,1dc) in 1sc of prv row.
If following shell with a plain dc row, work 3dc into each 1dc sp, and 1dc into each 1sc.

F. Lattice
4ch, * miss 1dc then 1dc next st, 1ch from * around slst into 3start ch = 18posts and 18 spaces around

Work 16 rows up side, counting 2sc rows as 1dc row. You may need more depending on the size of your bottle.

Step 4: Make the Bottle top
Work 2 rows B: plain sc
1row A: plain dc
1row F: lattice
1 row A: plain dc
2rows B: plain sc
1row A dc then work a final row of 1ch, 1slst around.

Step 5: Finish off
Make 2 lengths of ch each 20 inches/ 50cm.
Weave one through lattice row and knot ends, Weave second piece of chain through alternative spaces and knot on opposite tide of bag. This will give you 2 ties to pull up and tie in a bow. Add decorations if you wish.

Yep the bottles are now empty! I didn't drink them alone. Boy how I love the Brown Brothers wine. It is a spectacular drop.


Happy Crocheting!

Sunday, November 05, 2006

Wombats - Marsupial Madness

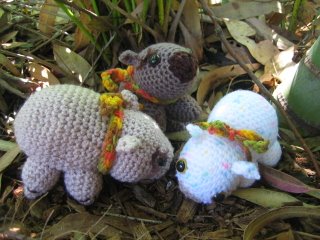
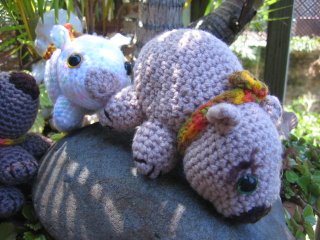
Well say G'day to the wombats! These are pure marsupial madness and took a bit of figuring out. Creating a wombat in crochet is no easy task.

They had the geat potential to look like a blob. The first version looked a bit blobby, then ratty, then doggy, but I am pleased with the end result.


I found that by changing the yarn and hook size I could vary the size. The speckly baby came out very cute.

Wombats are marsupials and closely related to the koala. They live in burrows and live on grass.

They are nocturnal, so aren't seen out and about much. They can swim, and believe it or not they have square poo! Not sure how that happens but cuboid droppings are a good sign that a wombat is about.


Wombats are stout, sturdy animals and live in burrows. Like the koala they are marsupials. They grow to about 1.3 metres in length, and can weigh up to 36 kg. They have a large, blunt head with small eyes and ears, and a short, muscular neck. Their sharp claws and stubby, powerful legs make them great diggers.

They have a reputation for being sleepy and a bit dim. For this reason blobby, dopey people often get the nick name Wombat. I remember a kid at school who was known as "Wombat".

Thanks for looking!

(c) copyright crochetroo patterns available at etsy - click the button in the links.

Housewife hussy in a crochet apron!


I eventually took the time to get the dolls down from the top of the cupboard to see if the apron would fit.

This doll was one of my teenage dolls when I was a little girl. Her name is Maria and I loved her so much. Her hair grows, and she has a button in her tummy to make it longer. I had forgotten I still had her. One thing in being a hoarder!

Maria must be about 40 now. Her hairstyle is vey 60s. I didn't keep any of her clothes, just the doll. I remember my Mum making her a beaded wedding dress. I have no idea what happened to this. So today Maria is naked under the apron, and is a bit of a desperate housewife! What a hussy!


I also tried the apron on the dishwashing liquid bottle. My boys thought I had completely gone nuts. This is Kitsch at its very best (lol).

The smaller aprons with the yarn were too small. I think you would need to make the neck loop longer and maybe have 2 separate lengths so you can tie the apron on.

I think the acrylic yarn is just the thing for this as it will wash well.


That is my silliness for the week. I hope you have fun with these.

Sunday, October 29, 2006

Little aprons - free crochet pattern

Little Aprons

Materials
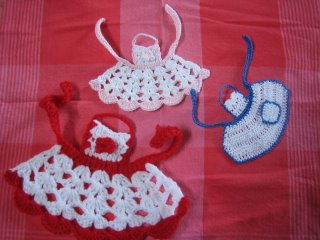
8 ply worsted weight 4mm hook makes an apron approx 12cm /5 inches from the top of the bib to the bottom of the skirt.

4ply, size 10 thread and a 2mm hook makes and apron approx 9cm /3 1/2 inches from the top of the bib to the bottom of the skirt.


Why little aprons?

These were designed in response to a request for some Christmas ornaments of a domestic nature. They have been designed with a neck loop so as to hang on a tree. I am not an aprony sort of girl so I had fun thinking about these. They have the grandma look which is kinda cute. I can imagine Granpa coming home to a hot dinner and Grandma slaving in the kitchen in her pretty apron.

I don’t have a Barbie doll, but I did wonder whether she might look good in one? Having made these I think they might have a use for a Kitchen tea. Not sure what you would do with them, but they would look pretty on a table. It also occurred to me they might be nice with a blessing or quote attached.

“The Apron Strings were his Re-entry Vehicle”: Buzz Aldrin's wife: Every woman should control 75 to 90% of her husband's life.

There are two sets of instructions: Australian and American so make sure you use the correct ones.


Pretty Polly : Australian Instructions


Waist tie
Make 62ch out of contrast colour. Start in 3rd ch from hook and work back along ch, make 59htr, 2ch and then 1slst finish in start ch.

Skirt
1. Miss 22st, and join main colour with a slst. Make 3ch, 1tr same sp, 1ch * miss 2, (2tr 1ch 2tr next st) 1ch. Repeat from * across 5 times, miss 2, 2tr next st (you will have 5 full shells and 2tr each end) turn at the end of each row.
2. 3ch, 1tr first st, 1ch (2tr 1ch 2tr) into 1ch at centre of each shell across, 2tr into last st.
3. 3ch, 2tr same st, 1ch * (3tr 1ch 3tr next st) 1ch. Repeat from * across 5 times, miss 2, 3tr next st.
4. 3ch, 2tr first st, 1ch (3tr 1ch 3tr) into 1ch at centre of each shell across, 3tr into last st.
5. Change colour, 3ch 4tr same sp, work 10tr into each shell across, 5tr into top of last st. finish off and weave in ends.

Bib - Turn work so as to make bib. Join main colour in the 22nd stitch from the end of the waist tie. This should correspond with the top of the 2nd shell group of the skirt.

1. 3ch, 1tr in 7st along band. These will centre over the middle 3 shells of the skirt, turn.
2. 3ch, 1tr next 7 across, turn
3. 3ch, 1tr, 1htr, 1dc, 1dc, 1htr, 1tr last 2st, finish off.

Neck tie
Join contrast at waist band at base of bib and work up side of bib - 1dc 1tr in base, 1 dc 1tr at base of next tr, twice, 1dc in top corner then make 15ch, 1dc 1tr in opposite corner of bib, 1dc 1tr at base of next tr twice, slst into the waist band. Finish off and weave in ends.

Flower - 4ch, 1dc into 1st ch made, (3ch, 1dc into first ch) 4 times = 5petals, slst finish off leaving a length of yarn to stitch flower onto bib.


Pretty Polly: American Instructions

Waist tie
Make 62ch out of contrast colour. Start in 3rd ch from hook and work back along ch, make 59hdc, 2ch and then 1slst finish in start ch.

Skirt
1. Miss 22st, and join main colour with a slst. Make 3ch, 1dc same sp, 1ch * miss 2, (2dc 1ch 2dc next st) 1ch. Repeat from * across 5 times, miss 2, 2dc next st (you will have 5 full shells and 2dc each end) turn at the end of each row.
2. 3ch, 1dc first st, 1ch (2dc 1ch 2dc) into 1ch at centre of each shell across, 2dc in last st.
3. 3ch, 2dc same st, 1ch * (3dc 1ch 3dc next st) 1ch. Repeat from * across 5 times, miss 2, 3dc next st.
4. 3ch, 2dc first st, 1ch (3dc 1ch 3dc) into 1ch at centre of each shell across, 3dc in last st.
5. Change colour, 3ch 4dc same sp, work 10dc into each shell across, 5dc into top of last st. finish off and weave in ends.

Bib - Turn work so as to make bib. Join main colour in the 22nd stitch from the end of the waist tie. This should correspond with the top of the 2nd shell group of the skirt.

1. 3ch, 1dc in 7st along band. These will centre over the middle 3 shells of the skirt, turn.
2. 3ch, 1dc next 7 across, turn
3. 3ch, 1dc, 1hdc, 1sc, 1sc, 1hdc, 1dc last 2st, finish off.

Neck tie
Join contrast at waist band at base of bib and work up side of bib – 1sc 1dc in base, 1sc 1dc at base of next dc, twice, 1sc in top corner then make 15ch, 1sc 1dc in opposite corner of bib, 1sc 1dc at base of next dc twice, slst into the waist band. Finish off and weave in ends.

Flower - 4ch, 1sc into 1st ch made, (3ch 1sc into first ch) 4 times = 5petals, slst finish off leaving a length of yarn to stitch flower onto bib.


Plain Jane : Australian Instructions

Make waist band as above.

Skirt
1. starting 22nd st from end of waist band make 3ch 1tr same st, (1tr next st, 2tr next st) 8 times across = 26 st
2. 3ch, 1tr each st across, turn
3. 3ch 1tr same st, (1tr next st, 2tr next st) 12 times across = 38 st
4. 3ch, 1tr each st across, turn
5. 3ch 1tr same st, (2tr together) 4times (1trnext st, 2tr next st) 8times, 2tr tog 5times, turn
6. 3ch, 1tr each st across = 36 finish off and weave in ends.
Join contrast at base of first st of skirt and work 1slst 1ch around edge.

Bib
Turn work so as to make bib. Join main colour in the 22nd stitch from the end of the waist tie. This should correspond with the top of the 6th group of st of the skirt.

1. 3ch, 1tr next 7st along band. These should be centred over the middle 3 shells of the skirt. Turn
2. 3ch, 1tr next 7 across, turn
3. Into 3rd st work 5tr, 1dc between 4th and 5th st, 5tr into next st, slst fin in top of last st.

Neck tie
Join contrast at waist band at base of bib and work up side of bib (1slst 1ch), 5times with final slst into 2nd tr in top corner then make 15ch, 1slst, 1ch 4th tr opposite corner shell of bib; work another (1slst 1ch) 4 times down side of bib. Finish with a slst into the waist band and weave in ends.

Pocket
1. 10ch, start 2nd form hook work 1tr next 7 = 8 turn
2 & 3. 3ch, 1tr next 7 turn. Finish leaving a length of thread to sew pocket to apron.
Join contrast at corner and work 1slst 1ch evenly around edge, weave in ends. Stitch pocket to front of apron.


Plain Jane: American Instructions

Make waist band as above.

Skirt
1. starting 22nd st from end of waist band make 3ch 1dc same st, (1tr next st, 2dc next st) 8 times across = 26st
2. 3ch, 1dc each st across, turn
3. 3ch 1dc same st, (1dc next st, 2dc next st) 12 times across = 38 st
4. 3ch, 1dc each st across, turn
5. 3ch 1dc same st, (2dc together) 4times, (1dc next st, 2dc next st) 8times, 2dc tog 5times, turn
6. 3ch, 1dc each st across = 36 finish off and weave in ends.
Join contrast at base of first st of skirt and work 1slst 1ch around edge.

Bib - Turn work so as to make bib. Join main colour in the 22nd stitch from the end of the waist tie. This should correspond with the top of the 6th group of st of the skirt.

1. 3ch, 1dc next 7st along band. These should be centred over the middle 3 shells of the skirt. Turn
2. 3ch, 1dc next 7 across, turn
3. Into 3rd st work 5dc, 1sc between 4th and 5th st, 5dc into next st, slst fin in top of last st.

Neck tie
Join contrast at waist band at base of bib and work up side of bib (1slst 1ch), 5times with final slst into 2nd tr in top corner then make 15ch, 1slst, 1ch 4th dc opposite corner shell of bib; work another (1slst 1ch) 4 times down side of bib. Finish with a slst into the waist band and weave in ends.

Pocket
1. 10ch, start 2nd form hook work 1dc next 7 = 8 turn
2 & 3. 3ch, 1dc next 7 st, turn. Finish leaving a length of thread to sew pocket to apron.
Join contrast at corner and work 1slst 1ch evenly around edge, weave in ends.
Stitch pocket to front of apron.

I hope you enjoy these.

(c) crochetroo. Pattern not to be reproduced. You can makes as many of these as you want and do whatever you wish with them. Have fun!

If you do come up with some interesting uses please let me know.

Thursday, October 26, 2006

Digger Dude Troll Doll

Meet Digger Dude! Digger was emailed to me from Terry in the United States who made him from My Shiela the Aussie Troll Doll pattern in a previous post.

Doesnt Digger look great?

Here are Terrys instructions for the clothes. I havent tested these and they are in American Terminology only so some of it doesnt make sence to me (lol).

Pants: make a chain long enough to fit waist, join. Dc every 4 chain and Triple c every 5th around.
Next row dc even join
Fold in 1/2 dc around join end
Join yarn and then dc around for the other leg
Ch for belt long enough to tie

Vest: chain to fit waist dc in each c turn
row 2 dc turn c 2
row 3 dc turn c 2
fold in 1/2 then 1/2 again
dc on 1/4 dc 2dc each row for 3 rows
repeat on the other side
dc across the remainder dc for back
stitch shoulders

Hair: fold yarn in half and hook through the top or the head trim and the vary carefully comb one piece of yarn at a time

Thanks Terry it gave me a buzz seeing how he turned out. I am sure your grandson will enjoy Digger!

Saturday, October 21, 2006

crochetroo buttons


This is a special thankyou to a kind soul out there who made me some cute little buttons.This person was very patient with me as it took me for ever to work out how to get them up on my site.

So I have my signature crochetroo koala button for my blog if you want to use it

This one is my signature crochetroo crocodile from my etsy store banner.

If I had to crochet them it would have been a piece of cake, but code to me is as foreign as Spanish. In fact I think I could learn Spanish quicker!

Now I have no idea how to make them link when you click on them, but I am excited at how cute they are. They are for you to use on your blogs if you please.

Thanks Jeanie, you are a very talented lady!

ps and now they do work! It's Magic!

Friday, October 20, 2006

Koala squares

(c) crochetroo

Well for some time now I have wanted to design a koala square. A koala granny doesn't sound right, but I guess there must be a few old Koala girls who live long enough to be a "granny"

While koalas are intrinsically cute, their colour grey isn't so I had to liven them up a bit with bright surrounds.


So after trying to figure out how to do a koala square I ended up with a few of them that I decided to turn some into pot holders. A few of these have been raoked os to some very special people. I like my koalas to go to good homes.

These I backed with a basic granny pattern that I rather like. The colours of this one are reminiscent of indigenous art and the beautiful colours of the outback.

And once I had the hang of the koala square I decided I would make a Koala Komfort Pram Rug. I have no idea what I will do with this as I cant see grandchildren on the horizon for many years, however I do think it turned out cute.

The colours were all left overs from other projects and have a nice earthy tone. I also like the gender neutrality of this one. I guess I could keep on koala-ing and make it bigger, but I think the koala suits a pram rug rather nicely. I felt a basic granny was all that was needed here to alternate amidst the koala faces. The green has a nice eucalyptus gum tree colour, and the yellow is like wattle.

You can also see Buster my avatar koala sitting quite comfortably in the garden.

Any good ideas for what else I can koala-ise?

Thanks for Looking!

Friday, October 13, 2006

More crochet rugs (afghans)

From the back of the cupboard...

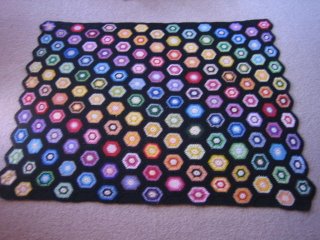
I am gradually photographing them all to share. This one I made a very long time ago - somewhere in the early 80s. It was one of the first full size afghans that I made. I recall I did this over a number of years. Bored with the square granny I took on a 6 sided one. I did this one out of scraps, and then as a true obsessive compulsive had to work a pattern out with the colours.

You can see when I lay it out on the floor how I achieved a rainbow effect. This is very basic but very effective, particularly with the black borders.


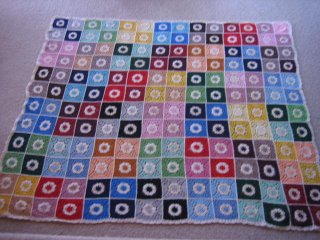
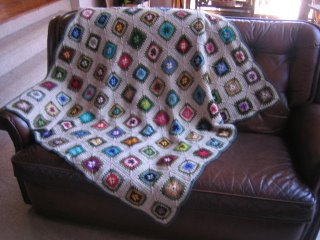
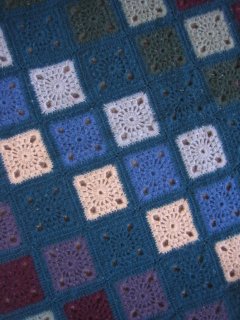
This is another one that I recently dragged out of the cupboard. Another oldie but goody. I made this for my daughters bed when she was little. You can see how I grouped the colours in blocks of four and then joined them with a simple white dc join. I made this one after the black one, as I was over black, and felt like something a bit lighter.

The block is a pretty pattern with a flower type centre and a pattern of shells in the corners. These two are now at least 20 years old and still in pretty good nick.

Thanks for looking!

Saturday, October 07, 2006

Butterflies, dragonflies and moths

I recently ordered some Monaco threads on line from Jackie in the Philippines. These are the most beautiful threads with fabulous colours.
I have had a lot of enjoyment creating some spring designs. I know butterflies are a bit cliche, but they are so pretty.
These are crochet using a 1.75 hook and size 10 thread.

This is based on the Cairns Birdwing which is the largest butterfly in Australia. In the rainforest they are a bright green and black with a red thorax. I based mine on the shape rather than the colour.

I also designed a simple dragonfly based on the glider dragonfies we get in the garden.
Then I did a moth. Moths are quite interesting as they have thicker bodies and stumpier wings. I used the yellow tiger moth as a model. I do like the way they turned out as they are a bit different from the usual winged insect.
I reworked the Ulysses a little bit to make the body a bit slighter. These ones have the characteristic swallow tail tips on the bottom wings. There is an earlier version of this pattern earlier on in this blog.
My plan wasn't to write another set of patterns for a while as it takes me soooo long to write and proof and translate. I was so enthused by the yarn that I have listed these patterns on etsy. Here is the link:


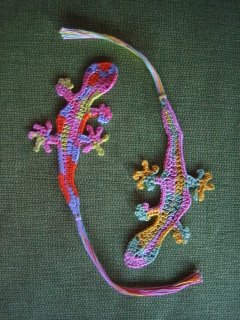
The good old gecko sure looks good in this thread. The colours give them that chameleon effect.
I gave the one on the left to a elderly uncle today. He was quite taken. He said that the geckos used to keep him awake at night. I never realised that geckos made a noise. I thought this was only frogs. They apparently they can make quite a racket.
Here is a sample of all the different colours in some of my bookmark designs. You can see turtles, crocodiles, geckos and butterflies. The colours are so pretty I just cant stop making these.
I certainly have a few to pop into cards for birthdays etc over the next while!
Thanks for looking. I am so glad it is spring. Seems strange to think that some of you are now entering your winter.


Hooroo!!
I got the threads here:

Sunday, October 01, 2006

Crochet Chook Tea Cosy

Cluck Cluck Cluck!!

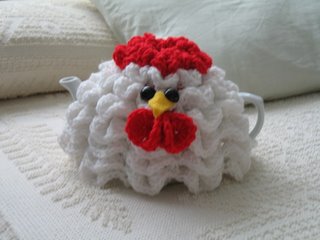
I posted instructions for the scallop tea cosy in May . I have been overwhelmed by the interest in this one. A keen crocheter and Chicken fanatic has added a few little bits and voila Madame Chook appears. This is so clever and looks very cute. Jamie has sent me her additions to the basic pattern, as well as the photo so you can all go forth and crochet Chicken Cosies.

From this:


I felt this was just the thing to post on my blog as it sits comfortable with the other crazy and fun ideas. Thanks Jamie for sending me your ideas!


To this:

Here is what she did:

"I just chained 7 and slip stitched to first chain and then chained 7 again and slip stitched to the first chain so that I had something resembling a figure 8. Then I put 12 DC in each loop, ended off and lightly stitched it together and shaped it into something resembling dangly chicken bits. Sewed it onto the cozy, added some eyes and a beak that I cut from fleece and it was done! "

I have been working on a Christmas variation which I will post in the future.

Isn't Jamies' chicken cosy fantastic?

Thursday, September 28, 2006

Christmas Turkey and Peppermint sweets.

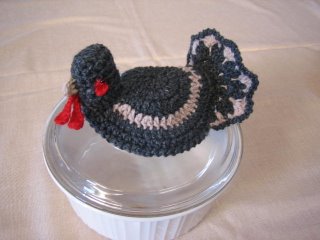
Gobble gobble.... here is the turkey that belongs to the set I posted a few days ago. A bit silly really! The only time we ever have turkey here is at Christmas. I cooked it a few years back and the boys really liked it so it is now become the norm. Besides now I have 3 teenage boy appetites to fill the humble chooky dinner doesn't go far.


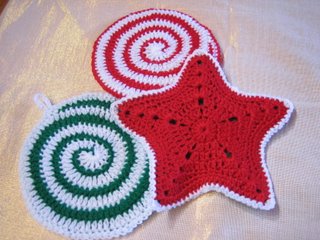
And here are the peppermint swirls. I just love Christmas mints in red and green. Such an effective pattern. I am planning on giving one of these to each of my work colleagues this Christmas.

The pattern is in my head, but I am happy I have mastered it to get a perfect circle. I think they pretty effective.


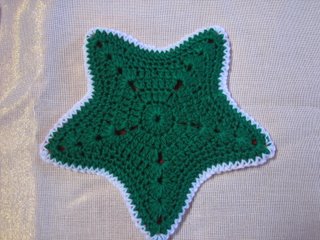
I also came up with a basic star potholder. The flip side is green.

Now all I have to do is start multiplying this little group to be ready by Christmas. I have had a few distractions late. A new job, Spring cleaning and trying to finish off a few rugs before the Summer hits.

Thanks for looking!

Saturday, September 23, 2006

Crazy Christmas Crochet

This is a Christmas Series I have been working on for a while now. I had the idea if I started now in September, I would have a nice little collection by Christmas. The plan is to have a heap of little presents for the Secret Santas and gift gifting.

My usual style is to race arround at the last minute. This year I plan to be organised.

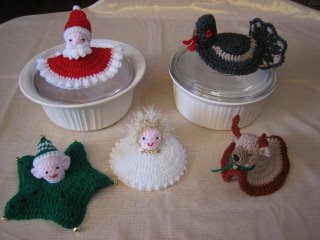
So based on my Crazy Casserole Topper Collection, I present the Crazy Christmas Crochet Collection.

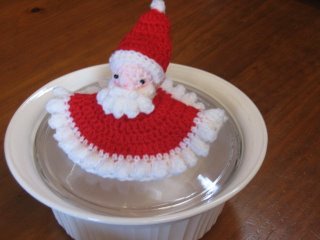
I started with Santa. I mean what is Christmas table without Santa ?

I gave him a nice fluffy beard, and stuck to the traditional red and white theme.

It did occur to me to try some different colours but I thought I would stay with tradition. I guess he might still look like Santa in blue or purple as I notice from time to time in the shops they change his colour scheme.
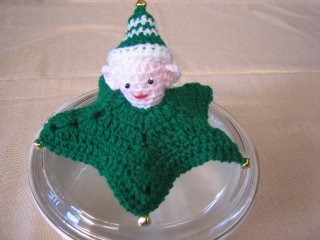
Now of course Santa needs an Elf or two, so I designed the Elf in green. He has the pixie ears, and I added bells to his top. The photo doesn't do him justice as he looks quite cute sitting on top of the casserole pot.

Next came an Angel. My son says she looks like a Crazy angel... and I said yep that was the goal! I mean why should an Angel look like Miss Prissy all the time! This one has partied hard and has a bit of Christmas jolly in her.

This is Santas Reindeer. Imagine this on your Venison Stew! We dont get much venison here. I did enjoy a nice piece a few years back when I was in New Zealand.

If you look at the group photo there is also a turkey. I will post him up later as blogger doesnt seem to want to let him join the others in this post.

I also have a few other Christmas pretties in the series.
I am in the process of writing up the patterns. This does take me a bit of time. The writing, the testing, the checking and finally the translation of terminology from Australian to American.

Thanks for looking.

Please respect my copyright. These images and ideas came from my grey matter and I post them for you to enjoy.

Saturday, September 16, 2006

Retro Rugs (Afghans)

These are some of my retro rugs that I made when the kids were little. This one is the traditional snowflake pattern. It is made in 5 ply wool. Way back then this was all I would use. It was quite expensive but had a lovely texture. To make a whole afghan in any thing heavier than 5ply, eg 8 ply would make the completed rug too heavy. There also wasnt much about in a synthetic so the options were limited.

I have always liked the bright colours. This one would be about 23 years old now and is pretty much as good as new. I did notice one little moth nibble which I need to fix when I laid it out.
I recall snuggling my daughter up with this one when she was little.

This one I made round about 1985. I started it while we were on a trip in England. Again it is 5 ply. I made this for my son when he was little. He will turn 21 this December. He has always liked greens and browns, and still does. I entered this one in the Gold Coast Show in about 87 and won second prize. I remember the judge telling me my front posts were too tight. I guess she was right! I do like how they form a criss cross pattern on the rug.


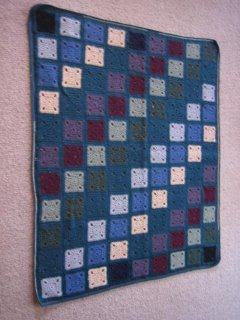
This is another one in 5ply pure wool that I made for the boys when they were little. This one is about circa 1990. I remember buying the wool at a Myers Sale at Pacific Fair here on the Gold Coast. I ran out of the teal colour and had to make shift with the black. It has felted over the years, but I have always liked the masculine colours in this one.

Sorry I don't know why the pictures are portrait. I guess you will just have to lay on your side to view this one!


I am gradually photographing my works of the past. My daughter and Mum in Law have a few which I must capture on a jpeg when I am next at their homes. Despite the age of these, the patterns are as effective now as then. I was never one to use baby colours for my kids afghans when they were small. This has paid off as these rugs look just as good today at the end of the bed, as what they did when the children were small. While some folk might think that crochet is daggy, I just love the home made feeling it gives a room.

Thanks for looking!