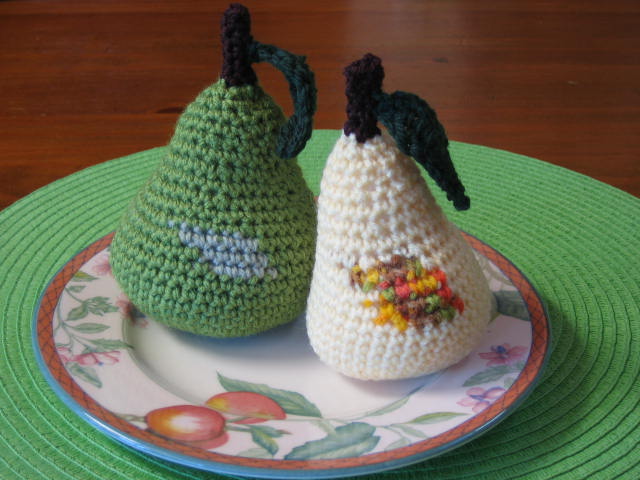
I just love to eat a juicy pear. At the moment bananas are a ridiculous price because of cylclone Larry, so pears have become a good alternative.
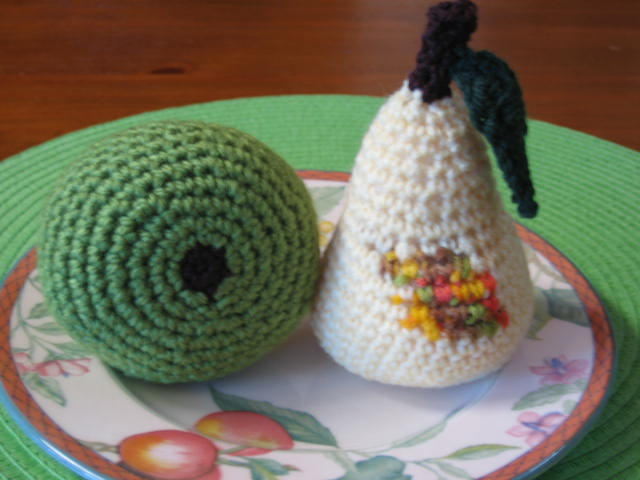
These ones are crochet. The green one is a packham pear, and the lemon one is a corella pear.
Pear juice is incredibly good for your insides. Apparantly it is a much more effective, and gentler remedy than prunes. A continence nurse once told me this, and who am I to argue?
Because I like pears so much I am posting the pattern. While pears aren't original, my patterns are, so remember this is copyright. If you do download the pattern, it would be nice to leave a message just so I can measure the popularity of the pear. Have Fun!
Australian Instructions
4mm or size 8 hook.
8 ply or worsted weight yarn
You need 4 colours: Brown for stalk and base, light green for body, lighter green or lemon for colour splotch. Leaf green
Large Pear
Starting with brown
1. 2ch, 6dc into 2nd ch from hook, slst into first ch
Change to green
2. 1ch, 2dc each stitch around slst first ch = 12
3. 1ch, (1dc next st, 2dc next st) around, slst first ch = 18
4. 1ch, (1dc next 2st, 2dc next st) around, slst first ch = 24
5. 1ch, (1dc next 3st, 2dc next st) around, slst first ch = 30
6. 1ch, (1dc next 4st, 2dc next st) around, slst first ch = 36
7. 1ch, (1dc next 5st, 2dc next st) around, slst first ch = 42
8 – 11. 1dc around on 42st, start each round with 1ch, and join with a slst
Make a colour splotch (optional if you prefer it plain)
12 – 14. 1ch, 1dc next 6, using a lighter green, 1dc next 5, working over main colour, then pick up main colour and continue round. Leave the second colour behind work. When doing the second round, gently bring lighter colour across back of work be careful not to pucker your pear.
15. 1ch, (1dc next 5st, 2dc together) around, slst first ch = 36
16. 1ch, 1dc around on 36st, join with a slst
17. 1ch, (1dc next 4st, 2dc together) around, slst first ch = 30
18. 1ch, 1dc around on 30st, join with a slst
19. 1ch, (1dc next 3st, 2dc together) around, slst first ch = 24
20. 1ch, 1dc around on 24st, join with a slst
21. 1ch, (1dc next 2st, 2dc together) around, slst first ch = 18 stuff pear
22. 1ch, 1dc around on 18st, join with a slst
23. 1ch, 1dc around on 18st, join with a slst
24. 1ch, (1dc next st, 2dc together) around, slst first ch = 12
25. 1ch, 2together around, slst and cut yarn. Add extra stuffing if needed
Make a stalk

26. Using brown, join to top of pear and work 6dc around. At this point it may be easier to work from the inside of your work in continuous rounds until the stalk measures 2 cm in length. Finish with a slip stitch and cut yarn. Insert your hook through the side of the pear, and up the middle of the stalk and pull the brown thread end through. This gives a neat finish.
Make a leaf
Using leafy colour make 10ch.
Starting in 2nd ch from hook, work back 1dc next 2ch, 1htr next 3ch, 1tr next 2ch, 1htr next ch, 1dc last ch.
Work 2dc into stalk about half way up. This will attach the leaf. Continue to work back along under side loops of ch: 1dc next 2ch, 1htr next ch, 2tr into next ch, 1htr next ch, 1dc next 3ch, 1slst and finish off. Weave thread end back through the leaf.
Smaller Pear
Work up to and including row 6.
7 -10 1ch, then 1dc around on 36 stitches.
11 – 13. Make a colour splotch as for larger pear, rows 12 -14. Once you master this you can add an extra few stitches in the next row.
14 – 19. as for rows 17 – 22 (omit row 23)
20. as for 24
21 – 22. 1ch, 1dc around on 12st, join with a slst
23. as for 25.
You may need to shape your pear with your hands when you have finished to make it sit just right.
American Instructions

4mm or size 8 hook. 8 ply or worsted weight yarn
You need 4 colours: Brown for stalk and base, light green for body, lighter green or lemon for colour splotch. Leaf green
Large Pear
Starting with brown
1. 2ch, 6sc into 2nd ch from hook, slst into first ch.
Change to green
2. 1ch, 2sc each stitch around slst first ch = 12
3. 1ch, (1sc next st, 2sc next st) around, slst first ch = 18
4. 1ch, (1sc next 2st, 2sc next st) around, slst first ch = 24
5. 1ch, (1sc next 3st, 2sc next st) around, slst first ch = 30
6. 1ch, (1sc next 4st, 2sc next st) around, slst first ch = 36
7. 1ch, (1sc next 5st, 2sc next st) around, slst first ch = 42
8 – 11. 1sc around on 42st, start each round with 1ch, and join with a slst
Make a colour splotch
12 – 14. 1ch, 1sc next 6, using a lighter green, 1sc next 5, working over main colour, then pick up main colour and continue round. Leave the second colour behind work. When doing the second round, gently bring lighter colour across back of work be careful not to pucker your pear.
15. 1ch, (1dc next 5st, 2sc together) around, slst first ch = 36
16. 1ch, 1sc around on 36st, join with a slst
17. 1ch, (1sc next 4st, 2sc together) around, slst first ch = 30
18. 1ch, 1sc around on 30st, join with a slst
19. 1ch, (1sc next 3st, 2sc together) around, slst first ch = 24
20. 1ch, 1sc around on 24st, join with a slst
21. 1ch, (1sc next 2st, 2sc together) around, slst first ch = 18 stuff pear
22. 1ch, 1sc around on 18st, join with a slst
23. 1ch, 1sc around on 18st, join with a slst
24. 1ch, (1sc next st, 2sc together) around, slst first ch = 12
25. 1ch, 2together around, slst and cut yarn. Add extra stuffing if needed
Make a stalk
26. Using brown, join to top of pear and work 6sc around. At this point it may be easier to work from the inside of your work in continuous rounds until the stalk measures 1 inch in length. Finish with a slip stitch and cut yarn. Insert your hook through the side of the pear, and up the middle of the stalk and pull the brown thread end through. This gives a neat finish.
Make a leaf
Using leafy colour make 10ch.
Starting in 2nd ch from hook, work back 1sc next 2ch, 1hdc next 3ch, 1dc next 2ch, 1hdc next ch, 1sc last ch.
Work 2sc into stalk about half way up. This will attach the leaf. Continue to work back along under side loops of ch: 1sc next 2ch, 1hdc next ch, 2dc into next ch, 1hdc next ch, 1sc next 3ch, 1slst and finish off. Weave thread end back through the leaf.
Smaller Pear
Work up to and including row 6.
7 -10 1ch, then 1sc around on 36 stitches.
11 – 13. Make a colour splotch as for larger pear, rows 12 -14. Once you master this you can add an extra few stitches in the next row.
14 – 19. as for rows 17 – 22 (omit row 23)
20. as for 24
21 – 22. 1ch, 1sc around on 12st, join with a slst
23. as for 25.
You may need to shape your pear with your hands when you have finished to make it sit just right.
I am thinking I might work on the whole fruit bowl, but this is a start. Have fun with these, and let me know if you find any gliches in the pattern.
© 2006 crochetroo Do not reproduce pattern by any means. You may use it for personal use, gifts and charity fundraising. Do not sell to make a personal profit.
Cupcake, those look good enough to eat! What a cute pattern, once again I'm awed by your talent. Thanks for sharing :o)
ReplyDeleteKiki (ChainOFools)
Thank you for the pattern! I love pears, too. Hope to see more fruits for the bowl. =)
ReplyDeleteThank you for the pattern! I'm always looking for crocheted food patterns for my kids' play kitchen. A lot cheaper than buying the plastic stuff - and easy to wash! Thanks!
ReplyDeleteCupcake I'm beginning to think you are a little fruity. Hee Hee (Just joking.) Those are really great! I like the embroidery on them, too. (Just in case someone might try to eat them, eh?) ;p
ReplyDeleteThanks for sharing your ingeniuty with us all!!
Oops I guess that isn't embroidery, it's a 'spot' on the pear. :)
ReplyDeleteThose pears look good enough to eat! Thanks for the pattern. I look forward to more fruits. You do such a great job!
ReplyDeleteNow I'm hungry for a nice juicy pear.
I also intend to make it for a child-kitchen -- for my niece and for my church's nursery.
ReplyDeleteThank you so much for sharing!
Other fruit? How 'bout plums, peaches, raspberries, blueberries, a bunches of grapes? And for vegetables: squash, onions, carrots, peppers.
Again, thank you SO much!
Thank you so much again for a great pattern!! I really love the pears ^_^
ReplyDeleteWell done! I love crocheted food so this is perfect for my collection. Keep up the creative work.
ReplyDeleteCupcake, once again, thanks for another well written and beautiful pattern. I'll have to start a "Cupcake's Patterns" folder on my hard drive!
ReplyDeleteLove the pears! Love the bananas even more! Hope you'll share that pattern! How about making strawberries? Chocolate dipped ones!!
ReplyDeleteI'm just learning so I hope I can make the pear look half as good as your picture. My sister was hit by a falling pear from her tree and broke her nose....so I thought I would send her some crocheted pears for her table instead :o)
ReplyDeletePenny
that was cool! I crocheted it and it turned out quite good. You know, it would be cool if you made up a free pattern for a penguin
ReplyDeleteThis is a great pattern. I always buy pears for a friend of mine each Christmas. Maybe I'll sneak one out this year and replace it with a crocheted one instead. Won't he be surprised?! :)
ReplyDeleteMay I have permission to use this pattern? I've got a table at the local Farmer's Market and I'm thinking these would be a huge hit.
ReplyDeletehya,thanks for the nice words/. My copyright states:
ReplyDelete"2006 crochetroo Do not reproduce pattern by any means. You may use it for personal use, gifts and charity fundraising. Do not sell to make a personal profit".
Sorry about that, but this is the only way I can protect my intellectual property.
I understand. That's why I asked!
ReplyDeleteI love your site. The pears are awesome. I am always on the lookout for fruit and vegetable patterns as my daughter wants me to make her some for her Horn of Plenty that she puts out in the fall. Still looking, so these will fit in nicely.
ReplyDeleteDollie
Oh, what's awesome with your recipes. It's difficult for me with the other language. I have to search the dictionary and translate for my practice ^_^ Many thanks for your sharing.
ReplyDeleteI have just learnt to crochet and have been searching for food patterns for my kids. Your designs are awesome. Then I was even more excited when I saw you were from the coast. I grew up on the coast and my family still live at Miami. I am now in Brisvegas. Great to see some great aussie patterns. Well done.
ReplyDeletethanks a lot for the pattern
ReplyDeletethanks for the pattern, it's really cute
ReplyDeleteI love!!!! Those pears!! They look exactly like the real thing!
ReplyDeleteVery nice!
ReplyDeleteMany thanks for a great pattern! I've made a couple of the pears for a display of fruit and veg by my local Stitch 'n' Bitch at Hove Museum - pics are on my Ravelry project page. Oh, I'm Wibbo on Ravelry. Best wishes from the UK, Jan
ReplyDeletethanks for the pattern they look wonderful! I hope it's not too hard for me though but it can't hurt to try :D
ReplyDeleteThese are beautiful. I can't stop looking at your stuff!! It's s cute and colorful and well made. It really brings life into crocheting! I'm 21 and I love to make things for my daugher. I'm sure she'll love a couple pretty little pears for her play kitchen
ReplyDeleteThese look great and I plan to give it a whirl.
ReplyDeleteJust one question...what is the difference in American and Australlian directions?
These pears are so lovely !!
ReplyDeleteMany thinks fot the pattern !
Thanks for posting this pattern! I can't wait to make one of these!
ReplyDeleteHi
ReplyDeleteThanks for these nice pear patterns.
Is there a pattern error in line 15 of the American directions? Pattern reads.....
15. 1ch (1DC next...)
Should this read
15. 1ch (1sc....)?
Thanks,
Emma
emma@protege.sca.org
thank you very much for sharing this pattern, I am going to make this for a friend who has a little girl with down syndrome, she has asked me to help her make her a little basket of fruits for her little girl. Thankyou very very much for sharing * Hugs from Canada *
ReplyDeleteLove these pears. Coming from Tasmania, where pears are grown, I am a great pear lover myself. There is nothing nicer than a sweet, juicy pear on a hot day. I hope you do work on the whole bowl of fruit. I'd love to see them all.
ReplyDeleteRegards
Christine
(Tasmania, Australia)
I'm adding this to my list of things to do, here in the States. Thanks for sharing!
ReplyDeleteThanks!
ReplyDeleteI've just started the wild ride of crocheting fruit for my 3 year old daughter's kitchen. Haven't crocheted in a decade. I asked her what she wanted me to make and she said 'A Pear'. These will be perfect!
Good afternoon
ReplyDeleteMay I have use your pattern ? I would like put translation in French here : http://stecolargol.over-blog.com/
I made this Pear ! it's so cute ! I love it ! I hope that you'll be agree ! I'm so sorry my english is so bad !
Thanks so much !
sincerely
soooooo cute! :p
ReplyDeleteamazing love it
ReplyDeletedo you make other fruit too?
My kids love pears! I am making on of these today. On second thought, two as there otherwise will be a battle for it. Thank you!
ReplyDeleteIt's 4 years after you posted this pattern, and I just dowloaded it to my collection. Thank you!
ReplyDeleteAsolutely fantastic pattern. The two i've made so far have turned out so well! Thank you xx
ReplyDeleteWonderful pattern - I hope my kids enjoy them.
ReplyDeleteI am going to give this a go, I recently made an owl for my daughter using this pattern:
ReplyDeletehttp://sixlittlemice.blogspot.com/2011/06/giggle-and-hoot-crochet-pattern.html
With your beautiful pattern, my crochet fruit basket for my niece grows. Love it. Greets from germany.
ReplyDeleteCan I post this in my blog soon ? (in Estonian)
ReplyDeleteI've never made fruits before, but I might give this a try!
ReplyDelete